Nothing beats the nostalgia of firing up your favorite classic game, but old cartridges don’t always work like they used to. Dust, grime, and years of storage can leave your treasured games glitchy or completely unplayable. The good news is you can bring them back to life with the right cleaning techniques.
You don’t need fancy tools or risky chemicals to get started. With a careful approach, you’ll restore your cartridges safely and protect them for years to come. Let’s dive into the steps that’ll help you enjoy your retro games just like you remember.
Understanding the Importance of Proper Cartridge Care
Proper cartridge care extends the lifespan of your old video game cartridges and guards your collection against permanent damage. Corrosion forms on the contact pins when dust, moisture, or skin oils persist, leading to errors during gameplay and potential data loss in battery-backed titles like Pokémon Red or The Legend of Zelda: Link’s Awakening. Manufacturers like Nintendo designed cartridges without protective cases in the 1980s and 1990s, making ongoing cleaning critical for titles from that era.
Storage choices also play a crucial role in cartridge preservation. Keeping cartridges in dry, cool environments preserves connector integrity, especially for games like Super Mario Bros., Sonic the Hedgehog, and Donkey Kong Country, which show higher resilience with routine care. Regular cleaning lowers the chance of internal circuit issues, which repair specialists cite as a leading reason for unreadable cartridges and lost saved games.
Restoring and cleaning your cartridges improves both functionality and preserved value, key for collectors interested in recognized titles such as EarthBound or Chrono Trigger. Prioritizing proper care not only safeguards your nostalgic experiences but also ensures better performance across generations of vintage gaming hardware.
Essential Tools and Materials for Cleaning Cartridges
High-purity isopropyl alcohol lets you safely dissolve grime from cartridge contacts and circuit boards. Use 91% or higher alcohol to avoid residue and maintain safe conductivity for electronics.
Cotton swabs with paper or cardboard shafts give you control and reduce fiber residue on metal contacts. Choose sturdy shafts to prevent breakage while cleaning tight spaces.
Soft brushes or toothbrushes help lift dirt and particles from cartridge shells, labels, and crevices. Pick a soft-bristled brush to avoid scratching surfaces, especially on vintage cases.
Security screwdrivers, such as 3.8mm bits or precision models, enable you to open most NES, SNES, N64, and Game Boy cartridges. Correct fit prevents stripping and lets you reach internal parts without damage.
Plastic erasers with clean, sharp edges can remove corrosion from contact pins in light cases. Apply gentle pressure to avoid scratching delicate metals or damaging board traces.
Game cartridge cleaner tools, including felted pads or specialized cleaning wands, provide an optional but efficient way to restore contacts. Use these dry or with alcohol for an even, controlled clean.
Store all tools and cartridges in a dust-free, dry area to minimize repeated cleaning and protect both the shell and internal contacts from future contamination.
Step-by-Step Guide: How to Restore and Clean Old Video Game Cartridges Safely
Follow these sequential steps using approved methods and tools to restore old video game cartridges without risking further damage. Each step reinforces the safe handling, cleaning, and preservation of your cartridge collection.
Inspecting the Cartridge for Damage
Inspecting the cartridge surface and contact pins comes first before cleaning. Look for signs of cracked plastic shells, missing or broken pins, and corrosion. Multiple types of visible damage, like chipped pins or heavy corrosion, indicate that certain cartridges can’t be repaired with cleaning methods.
Cleaning the Cartridge Exterior
Cleaning the cartridge exterior removes surface dust and grime without penetrating the plastic shell. Use a soft brush, makeup brush, or microfiber cloth lightly dampened with 91% isopropyl alcohol for best results. Focus cleaning on finger-hold regions and the outer shell, avoiding excessive liquid that could seep inside.
Safely Opening the Cartridge (If Needed)
Opening the cartridge grants access for deeper internal cleaning if exterior methods don’t suffice. Remove the screws using the appropriate security Torx or tri-wing screwdriver. Place the circuit board on a soft surface to protect fragile solder points and chips. Apply gentle force only, never prying plastic housing or PCB components.
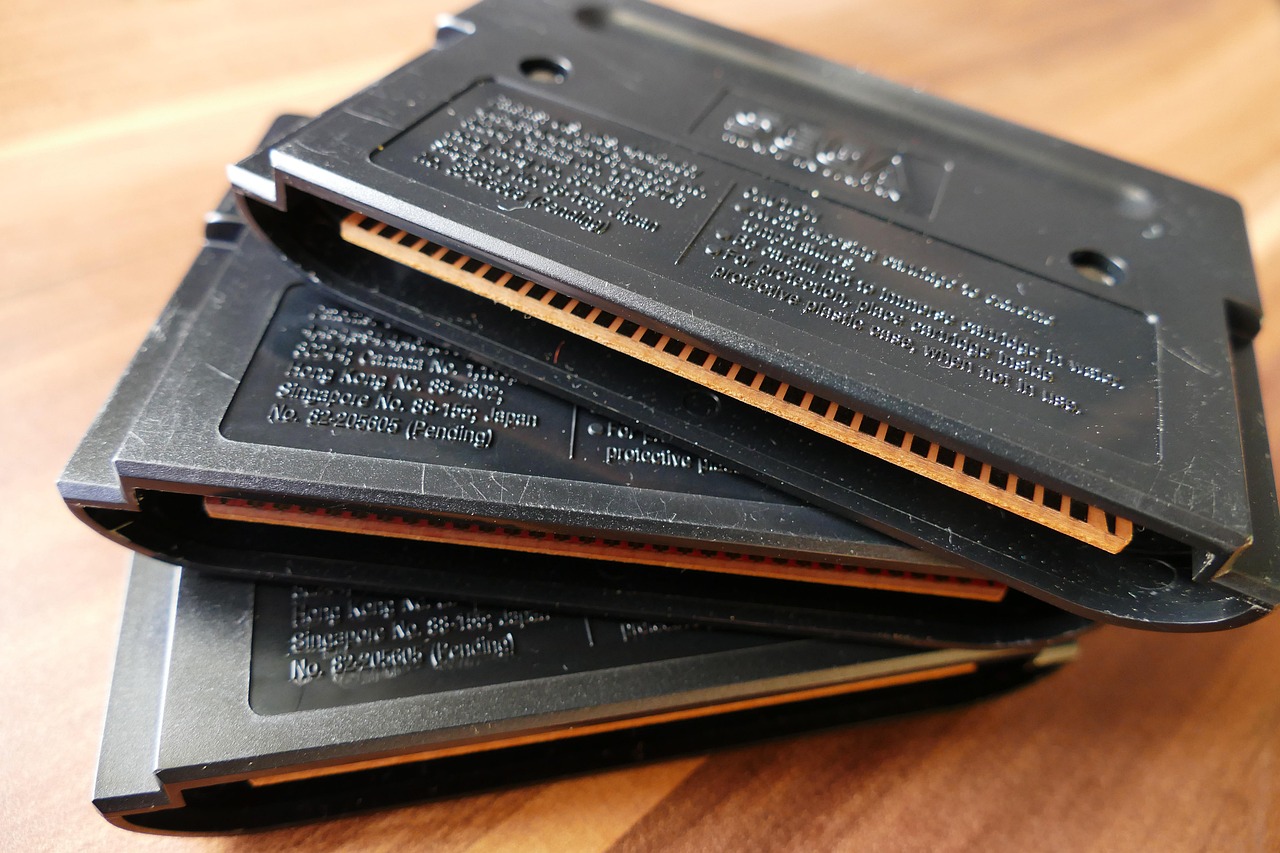
Cleaning the Cartridge Contacts
Cleaning the cartridge contacts targets thorough removal of corrosion and tarnish from the metal pins. Dampen a cotton swab with 91% isopropyl alcohol, and drag it gently along each contact. Use only paper shaft swabs, as plastic shafts might fragment or shed fibers. If light corrosion persists, use a clean white plastic eraser to lightly polish contacts. Consider specialized felt pad cleaning tools with alcohol for highly oxidized contacts.
Reassembling the Cartridge
Reassembling the cartridge follows completion of cleaning and drying. Return the circuit board to the shell, aligning notches or stoppers to guarantee a correct fit. Insert screws by hand with moderate pressure, tightening just enough to secure the shell but avoid cracking the plastic. When all parts are dry and properly seated, your cartridge should function more reliably while being protected from further damage.
Tips for Preserving Cartridge Longevity
Store game cartridges in a cool, dry place to limit corrosion and mold growth. Shield your cartridges from humidity, heat, and direct sunlight, since environmental extremes accelerate plastic degradation and increase the risk of contact oxidation. Keep each cartridge in a protective case or a resealable bag so dust and airborne particles can’t settle on the contacts or inside the housing. Maintain a regular but infrequent cleaning schedule—clean contacts only when necessary, as frequent abrasion shortens connector life. Inspect connectors and save batteries using tools like a multimeter, so you can swap batteries before they leak or lose charge, especially for battery-backed titles. Handle cartridges with clean, dry hands to prevent skin oils from transferring onto contact points and plastic shells. Always return cartridges to their storage containers immediately after use, so atmospheric dust and moisture don’t accumulate. Clean both the cartridge and connector port, since dirt left in the port can recontaminate even a freshly cleaned cartridge.
Common Mistakes to Avoid During Cleaning
Skipping precautions can damage old video game cartridges, so avoid these frequent errors for optimal restoration and preservation.
- Blowing into cartridges introduces moisture and saliva, which causes metal contacts to oxidize and corrode over time.
- Using abrasive tools like steel wool or low-grit sandpaper scratches and removes protective layers from cartridge contacts and plastic shells.
- Applying excessive isopropyl alcohol drenches the contacts, increasing the risk of short circuits and improper drying which leads to corrosion.
- Using water, household cleaners, or products like Windex leaves residues that promote further corrosion and degrade electrical conductivity.
- Flooding cartridge interiors with cleaning fluids saturates sensitive components and threatens label adhesives.
- Forgetting to thoroughly dry contacts before reassembly allows residual moisture to accelerate internal decay.
- Using excessive pressure when erasing corrosion distorts or scratches fragile contact surfaces, causing unreliable connections.
Carefully follow each step and use minimal, appropriate cleaning methods to maintain game cartridge performance and longevity.
Conclusion
Taking the time to restore and clean your old video game cartridges pays off with smoother gameplay and longer-lasting memories. With the right approach and a little patience you’ll keep your collection in top shape for years to come.
Remember a gentle touch and the right storage can make all the difference. Treat your retro games with care and you’ll enjoy their nostalgia and value well into the future.
No responses yet